Notice: Function _load_textdomain_just_in_time was called incorrectly. Translation loading for the wpeditor domain was triggered too early. This is usually an indicator for some code in the plugin or theme running too early. Translations should be loaded at the init action or later. Please see Debugging in WordPress for more information. (This message was added in version 6.7.0.) in /home/sites/6b/5/511b50458a/public_html/wp-includes/functions.php on line 6260

Notice: Function _load_textdomain_just_in_time was called incorrectly. Translation loading for the wp-spamshield domain was triggered too early. This is usually an indicator for some code in the plugin or theme running too early. Translations should be loaded at the init action or later. Please see Debugging in WordPress for more information. (This message was added in version 6.7.0.) in /home/sites/6b/5/511b50458a/public_html/wp-includes/functions.php on line 6260

Notice: Function add_shortcode was called incorrectly. Invalid shortcode name: explanatory dictionary. Do not use spaces or reserved characters: & / [ ] = Please see Debugging in WordPress for more information. (This message was added in version 4.4.0.) in /home/sites/6b/5/511b50458a/public_html/wp-includes/functions.php on line 6260

Notice: Function add_shortcode was called incorrectly. Invalid shortcode name: no explanation. Do not use spaces or reserved characters: & / [ ] = Please see Debugging in WordPress for more information. (This message was added in version 4.4.0.) in /home/sites/6b/5/511b50458a/public_html/wp-includes/functions.php on line 6260

Notice: Function _load_textdomain_just_in_time was called incorrectly. Translation loading for the wordpress-seo domain was triggered too early. This is usually an indicator for some code in the plugin or theme running too early. Translations should be loaded at the init action or later. Please see Debugging in WordPress for more information. (This message was added in version 6.7.0.) in /home/sites/6b/5/511b50458a/public_html/wp-includes/functions.php on line 6260
March 2019 - Lost Lens Caps
Sony Front Facing Screen Hack

Sony Front Facing Screen Hack

Following the recent mirrorless camera releases from various cameras such as Canon and Nikon, has made me appreciate how far Sony has come from it’s early days in the mirrorless market. I’ve been a (reluctant) Sony user from the first Sony A7. Along the way, I’ve lived with small batteries (which never bothered me), lackluster AF, a single card slot (again, never really bothered me), laggy viewfinder, questionable colour rendition and a challenging menu system and with the release of the Sony A6400, featuring a front facing screen, it would appear that serious vlogers and videographers finally have their needs appeased.

Prior to the A64000, most serious vloggers and videographers have taken to various solutions to overcome the lack of a front facing screen, the most common is to mount a big an bulky video monitor such as the Andycine A6. What most people don’t realise though, is if you own any Sony camera which has the Smart Remote app, there is a good chance that you can have a compact and convenient forward facing screen. Not only do you have the option of adding a front facing screen but you can use the same screen remotely, trigger your shutter and zoom.

The Hack

The solution lies in Sony’s own RM LVR1 and LVR2 Live View monitors which they sell as an accessory and often bundle with their HDR/FDR series Action Cameras. These are meant to be used as monitors and remote trigger for their action cameras but can be used, as far as I am aware, with any Sony camera which has their Smart Remote app/function and is WiFi enabled.

The remote units themselves have various advanced functions which only work with the AS action cameras, such as GPS tagging (LVR2), intervalometer, etc. Used on non HDR/FDR cameras all you would be able to do is view the live feed off your camera and trigger the shutter, which is good enough for most people. These viewers work best with Sony cameras which utilise the Sony camera apps, specifically Sony’s Smart Remote app, which is something Sony dropped from their lineup of cameras from the A9 onward. Even without the app, the current line of Sony cameras can still connect via the built in ‘Control with Spartphone‘ feature. However, it would appear that the older LVR1 is more compatible as you can use the LVR1 on the latest A7 Mk3 but not the LVR2.

The RM LVR1 and LVR2 units look physically identical, with the 2 having the additional ‘GPS’ label above the screen. The front of these units have a bright 32x24mm (3.8cm/1.5″ diagonal) LCD screen, a zoom rocker switch, a shutter button and a recording status indicator. To the sides, there are a Menu and Display buttons on top, an On/Off button on the bottom and a sealed charging port on the left.
I can’t find any specific information on the screens themselves but in a side by side comparison confirms that the screen on the LVR2 is noticeably sharper than that on the LVR1. Additionally, the LVR2 can be set to a higher brightness mode as a Menu option, whereas the LVR1 is stuck at a default brightness. It’s worth noting, though, that setting the LVR2 to high brightness will significantly reduce battery life.
 
As you can imagine, for a viewfinder meant to be used with action cameras, even the LVR1 screen is bright enough to cope with bright outdoor conditions. The LVR2 screen set to high brightness is significantly brighter and copes at least as well as the Live View screen on my A7 Mk3 on full brightness. Even though the live view is transmitted via WiFi, the stream is smooth and the resolution of the screen (resolution unknown) is good enough to pick up when things are not in focus, assuming you’re not using a lens with very large aperture. All in all, it’s more than adequate to function as a viewer to frame your shot and check overall focus.
The zoom rocker switch will control the optical zoom on a Sony camera with a fixed zoom, such as the RX100 series, or an PZ (Power Zoom) series lens on an interchangeable camera. Even if you do not have a PZ series zoom lens attached, you can still “zoom” if you have enabled Sony’s Clear Image Zoom  and Smart Zoom function on your camera. In fact, the action cams which these are meant for do not have optical zooms.
 
The remote shutter release is a fairly responsive single stage affair. There is no dual stage, focus and then trigger functionality, so you’ll need to set focus using the camera’s shutter release button before recording. Assuming that you are using the screen for vlogging, you can just set the camera to Continuous Focus and enable Face Detection. The shutter also only triggers in either Stills or Video mode, as set on the host camera. The LED below the shutter release glows blue when the unit is turned on and turns red when it is recording.
 
The On/Off button is self explanatory. The Display button toggles the display on the screen to either display indicator icons on the screen or a clean, icon free, screen. The Menu button allows you configure and access functionalities in the unit. For non action cam purposes, the only things we will need to access are the WiFi connectivity, Shooting Mode and Date/Time settings, which will be covered below as I describe what you would need to do to set the units up.
 
These units have a Wi-Fi range of around 5 meters (16 feet) and are waterproof to a depth of 3 m (10 feet) for 30 minutes continuously, which makes this a great option for using as a general remote control with the additional bonus of it being waterproof.
 
They charge off standard 5v USB which means they can be charged using a wide range of devices, including portable power banks. The charging time vary from 3-4hrs, from empty, and lasts approximately 4 hours under continuous usage. Interestingly, the units are powered by the same batteries, NP-BX1, powering the Sony RX100 series.

Compatibility

The Sony RM LVR1 or 2 costs around US$100 second hand or US$150 new. There is also a RM LVR3 which is only ever sold with the Sony FDR series action cameras. If you don’t already have one of these units, check the compatibility chart below before committing to getting one. I’ve listed all the Sony cameras I’ve tried the LVRs on. If you are successful in pairing the LVRs with one of the Sony cameras where I have no data on, please let me know in the comment section below and I’ll update the list.

A7 – LVR1 and LVR2, Confirmed working

A7 Mk2 – LVR1 and LVR2, Confirmed working

A7 Mk3 – LVR1 Confirmed working, LVR2 incompatible

A7R – Unconfirmed

A7R Mk2 – LVR1 and LVR2, Confirmed working

A7R Mk3 – Unconfirmed

A7S – Unconfirmed

A7S Mk2 – Unconfirmed

RX1 – Unconfirmed

RX1R – Unconfirmed

RX10 – Unconfirmed

RX10 Mk2 – LVR1 and LVR2, Confirmed working

RX10 Mk3 – Unconfirmed

RX10 Mk4 – LVR1 Unconfirmed, LVR2 Confirmed working


RX100 – Unconfirmed

RX100 Mk2 – Unconfirmed

RX100 Mk3 – Unconfirmed

RX100 Mk4 – Unconfirmed

RX100 Mk5 – Unconfirmed

RX100 Mk6 – Unconfirmed

NEX 3/T – Unconfirmed

NEX 5/T – Unconfirmed

NEX 6 – LVR1 Unconfirmed, LVR2 Confirmed working

NEX 7 – Unconfirmed

A5000 – Unconfirmed

A6000 – Unconfirmed

A6300 – Unconfirmed

A6500 – LVR1 Unconfirmed, LVR2 Confirmed working

QX1 – LVR1 and LVR2 Confirmed working

QX10 – Unconfirmed

QX30 – Unconfirmed

QX100 – Unconfirmed

Setting up the RM LVR

Before you begin to pair your remote with your camera, you’ll need to set up your RM LVR unit. Please refer to the LVR manual (links below) for detailed instructions. In brief, the process is:
  • Turn on the unit using the On/Off button at the bottom of the unit
  • Ensure that the unit is set up for single camera control
  • Set date and time

WiFi pairing

  • Turn on your camera
  • Connecting
    • If you are using the Sony Smart Remote App, go to Applications, select “Applications List” and launch the Smart remote Control App.
    • If you are using a later Sony camera which does not support Sony camera apps, go to Network, select “Ctrl w/ Smartphone” and then select “Connection“
  • The RM LVR unit should detect your camera and show this on it’s screen. Highlight the camera and press the shutter release button
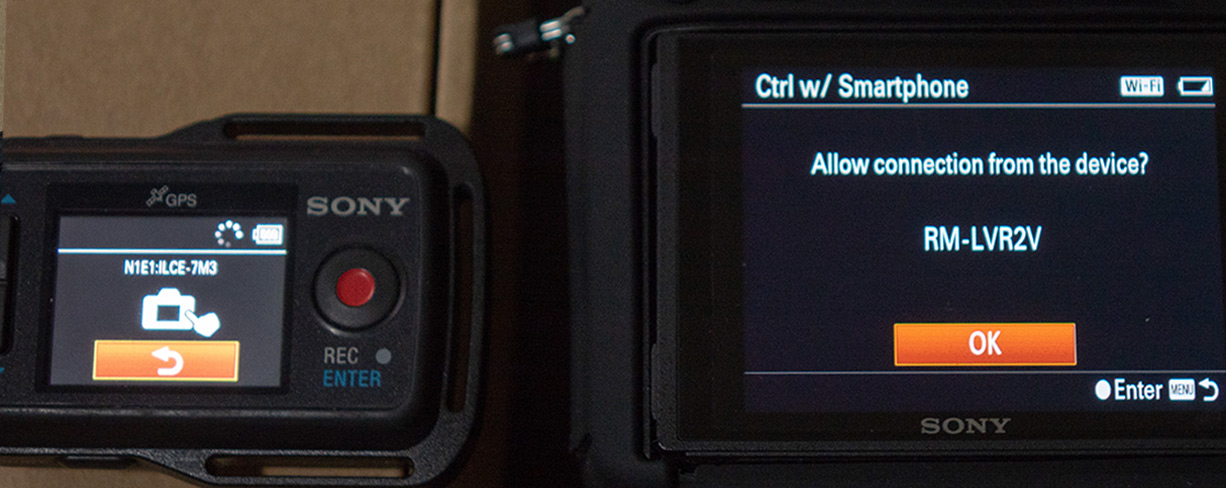
  • On your camera, the camera should detect that your RM LVR is trying to connect and ask you to approve connection.
  • Click “OK” and the camera should enter into remote mode and supply the RM LVR with a live view of your camera.
If the last step fails, start again.
With some cameras, it may ask you to enter a passcode shown on the RM LVR screen. Enter this number on the camera and it should pair automatically moving forward. This has only happened to me once, when trying to pair a RM LVR2 with a A7 Mk3. If that fails then you may not be able to pair.

Mounting

The RM LVR units come with a wrist band and mount and is meant to be worn on the wrist like a watch, which is fine if you’re using it as a remote but if your intention is to use the unit as a vlogging screen, that’s not going to be much use. Fortunately, once the units are removed from the wrist band, they are fairly small and light. Which makes them easy to mount.
 
The reason I started this site is to apply my interest in 3D printing, into make things for photography and videography.  I’ve made a simple mount to mount the RM LVR units to the hot shoe of a camera which will make using these viewers for vlogging, a lot more practical. In addition to being forward acing, the bottom of the mount will also accept a standard 1/4″ screw thread mount which will enable a videographer who is using a cage system to mount it using a double ended tripod screw.
This basic 3d printable mount, in STL format,can be downloaded using this link.
 
If you do not have access to a 3d Printer, I can sell you one for USD10 (excluding postage) if you contact me via my contact links or leave me a comment with your email below. The example in the image above was printed in off white to make it stand out, the version I can supply will be printed in black.
 
This basic mount won’t suit everyone, and I encourage anyone to use the model I have provided to make versions to mount to your specific requirements. It would, for example, be easy to make a version which mounted to a video rig or to a gorillapod. If you do, please let me know and I’ll share this too.

​

Conclusion

Is it worth getting one of these? Well, I am presenting this as a hack rather than a solution because this hack won’t suit everyone.
 
If you currently shoot video or vlog with pre A6400 Sony ILCE cameras or have been put off vlogging with older (cheaper) Sony cameras because of a lack of a front facing screen then it’s an easy decision.
 
For a $100, you get a front facing screen which runs off it’s own battery. Because it is also a remote control, it can be detached, enabling you can place your camera on a tripod or convenient stable spot, walk away from the camera with the remote, frame using the zoom and record. You get dual functionality out of one device. Even used as a stand alone remote, it does most of what the newly released Sony RMT-P1BT which costs $80 and has a longer range, is properly waterproof and has Live View.
 
Personally, I find side flipping monitors a bit of a compromise as you would need to angle the camera slightly to the side to be able to view the screen, which introduces distortion. Not a nice thing to have if you’re filming yourself at wide angles of view.
 
For the serious videographer, there really is no substitute for a dedicated video screen. Not even a flip forward screen will do and for those of you who reckon that you can also touch focus with a flip forward screen, try it. You’ll need two hands to start with and in most situations you’ll end up looking really pinched with two hands fully outstretched. If you’re using any sort of extension, like a gorillapod, that’s a non starter.
Street photographers will like the discreet nature of the remote. It fits neatly within the palm of your hand. You could point your camera at a subject without facing them, glance at your palm to frame and trigger the remote with your thumb.
 
This is a technique already widely used by street photographers, using apps on their smartphones. The LVRs offer a more discreet option which will not drain your smartphone. Leaving you plenty of juice to post your shots to Instagram, Facebook or just plain old calling people.
On the minus side, $100+ is a lot to pay for a remote control for photographers who only do stills when it will cost you between $10 and $30 for a basic 3rd party Sony remote. The higher priced ones often come with intervolometer functionality. The LVR’s also do not have Bulb mode which potentially rules it out for astrophotographers and landscape photographers. But then again, the lack of screen resolution would probably rule it out for them anyway.
 
The LVRs also work over WiFi, as opposed to the Bluetooth as used on the RMT-P1 BT, which provides much better range at the expense of battery life. The LVRs have built in batteries which help but the fact remains that your camera has to transmit the live view over WiFi using the camera’s battery.
 
The WiFi pairing and activation takes 5-10 seconds to initiate and makes it a lot less immediate to use. If you are using the Smart Remote App, it’s also annoying to have to exit the app before you have manual control of your camera.
 
In the end how useful this will be to you, as with any accessory, will come down to how you shoot. If you already have a Sony action cam and a LVR, or know someone with one, give it a go. It might just surprise you.

Specifications

Power requirements: Rechargeable battery pack: 3.6 V (Internal
battery)
Multi/Micro USB Terminal: 5.0 V
USB charging: DC 5.0 V, 500 mA/800 mA
Charging time: Via a computer: Approx. 4 h and 5 min. Via a AC-UD10 (sold separately): Approx. 2 h and 55 min.
Waterproof performance: Depth of water 3 m (10 feet), 30 minutes continuously (The waterproof performance is not guaranteed under all circumstances)
Operating temperature: -10 °C to +40 °C (14 °F to 104 °F)
Storage temperature: -20 °C to +60 °C (-4 °F to +140 °F)
Dimensions (Approx.): 72.3 mm × 50.2 mm × 20.8 mm (2 7/8 in. × 2 in. × 27/32 in.) (W/H/D, excluding protrusions)
Mass: Approx. 64 g (2.3 oz) (only the main body)

​

Support page – Manuals, Drivers Firmware

LVR1 – https://www.sony.co.uk/electronics/support/remote-controls-rml-series/rm-lvr1
LVR2 – https://www.sony.co.uk/electronics/support/remote-controls-rml-series/rm-lvr2​